
Geek my Glock: Glock 19 Transformation
set out to do a couple things with this Glock, first, was to see if I could rekindle my like for Glocks which was lost in the mid-1990’s and second, to see if I could customize one below the extreme cost of aftermarket upgrades offered by various companies.
My first run-in with Glocks was in the mid-1990’s when I got the Glock 17 (food container box and all). It looked interesting, as it did not have a traditional hammer like most pistols at the time and it was very easy to disassemble. Over time, I began to realize it was not for me. The two reasons, and these are personal preference, is the trigger pull was a little too much and it just didn’t feel “right” in my hand. For me, the trigger pull was tight and it threw off my shot accuracy by the time I heard “bang”.
After many years, I began to develop a love affair with the Sig line of handguns. My first love was the P229 and eventually the P226, P220, etc. For some reason, I shot better with the Sig and the pistol felt great in the hand. While I was enjoying my Sigs I couldn’t help but see the obnoxious love affair with Glocks (fan boys) and the overwhelming amount of owners customizing their pistols. My philosophy was, if you have to customize your stock pistol that much to enjoy it, then why bother? But of course, like most gun lemmings, I followed suit and decided to buy a stock Glock and see what the buzz was about.
To be honest, back when I got my Glock 17, I was coveting my friend’s Glock 19. I’m not a fan of full size pistols, I feel you can get almost as much mag capacity from a mid-size and conceal it better. Having said that, I chose the Glock 19 Gen 4 to do the transformation. I figured the backstrap options would alleviate my issues with handling the Glock. Ironically, I liked it without a backstrap option, I guess over the years my hands grew and nat
Now it was on to serious business, my goal was to change out as many stock parts as possible whether it needed it or not. Most of this was for functional upgrading but I’ll be honest, there was a little bit of me that added some unnessessry parts only for the “cool guy” factor…at least i’m admitting it.

Safety Brief: Attention! Before you do ANY modifications on ANY firearm, you must ensure the weapon is cleared and it is safely disassembled. Always treat firearms as if they are loaded. This article is for entertainment purposes only, any modifications to your firearms should be conducted by a trained gunsmith
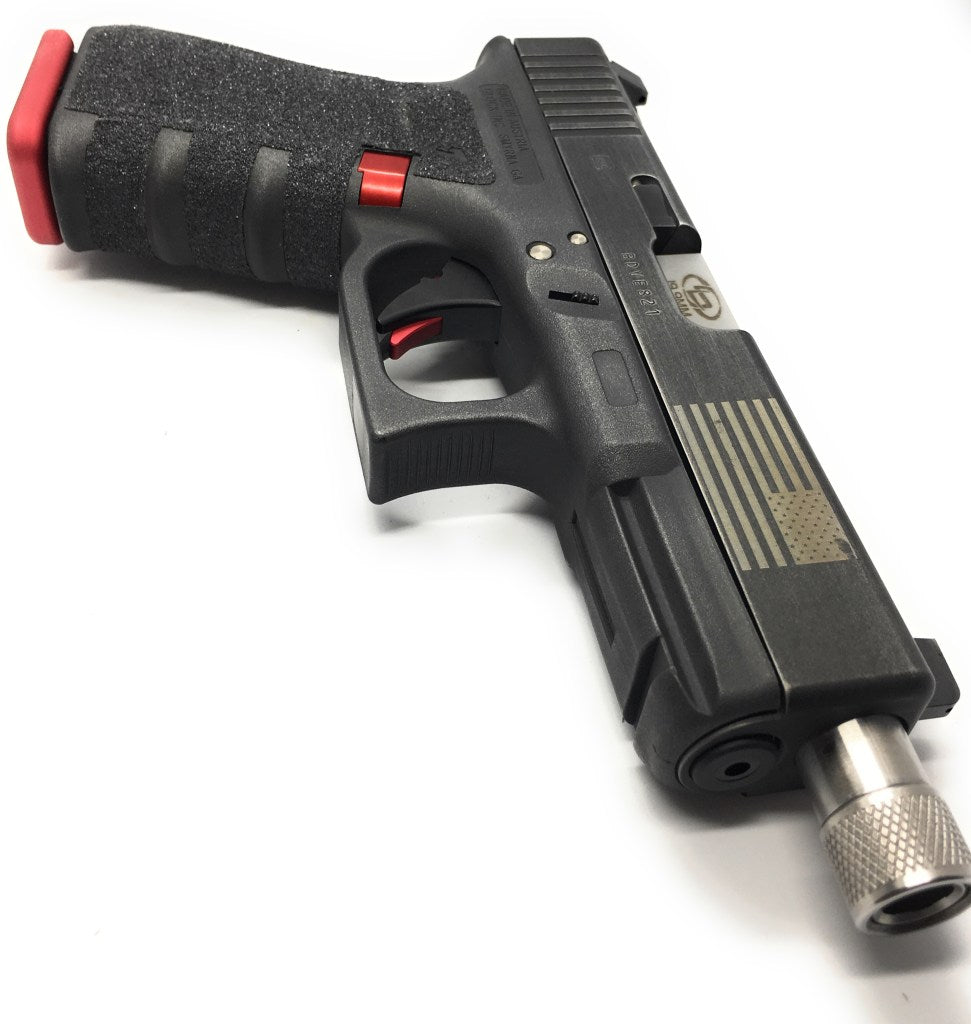
My first step was to change the major issue with the Glock that I did not like, the trigger. When I tested the stock trigger pull, it was hitting consistently at 7.5 lbs, sounds about right. With that said, the trigger received the eviction notice. I decided to try the Zev Fulcrum trigger to replace it. As you can see, it comes with many options and goodies, the most important is the ability to adjust the travel of the trigger pull. Additionally, it comes with two optional firing

pins springs (2 or 3 lbs) and a race connector. I chose the 3 lbs trigger even though I don’t plan on building this as a competition gun. Once I installed the Zev Fulcrum, it brought down the trigger pull significantly down to about 4.5-4.75 lbs pull. With about 3 lbs shaved off from the trigger, I was ready to continue the process of geeking this thing out.
I also changed out the slide release lever and swapped it out with an extended release. I mention this here because this is a good time to install it while your changing out the trigger.
Prior to disassembly of the current trigger, I was afraid it was going to be a “process” similar to my Sig P226, surprisingly, it was easy. I’ve included a link to a video explaining the process, which essentially involves three pins and your Glock tool. Pay special attention to the order of the pin take down and reassembly, it means something. Lastly, when taking out the pin which holds the slide release in place, be sure to wiggle the slide release to allow the pin to come out. It may feel like the pin is stuck, it’s not, you just need to wiggle the slide release and it comes right out with minimal pressure from the Glock tool.
The one thing I will note about the Glock is the extreme ease of disassembly down to pins and springs. As mentioned earlier, I’ve done a similar job on my P226 and it was nowhere near as easy, kudos to Glock for being idiot proof! The best thing about the disassembly is that you only need one tool (not including sight removal), which is basically a standard punch that you can by from Glock or aftermarket.
The next two modifications were extremely easy to complete, the first was installing a drop-in barrel from Storm Lake Barrels, the second is a custom backplate from Bastion LLC. I decided on the Storm Lake barrel because of my previous experience with one on my Sig P226. The accuracy of the barrel and the ease of fit, was perfect.

Unfortunately, it seems as though Storm Lake no longer makes barrels for Sig, looks like I have a rare piece now on the P226. I decided to go with the extended barrel for a suppressor, this was one of those “cool guy” modifications I mentioned earlier.

The Bastion LLC back plate was extremely easy to install, just be careful of spring launch. Use the trusty Glock tool to relieve pressure on a spring, slide the current backplate off and then do it all in reverse order. I really just oversimplified the process, so here is a quick video from Glockgeist showing how to do it in full detail. I chose the 1st Cavalry Division backplate from Bastion LLC to represent my old unit, 1st Team! They have a long list of choices however, go check them out.
The next modification, if you want to call it that, was half functional, half cool-guy. As stated earlier, I’m not a big fan

of the grips, what I am a fan of are Talon grips.
I love these things and find an excuse to put them on all my pistols, I like the way they look and feel, especially the “grip tape” version. Talon has them in a “rubber” type grip, but I like the grittiness of the grip tape, it provides a positive grip all the time. The only issue is, that the grip tape will snag and scratch items it comes in contact with (shirt, table, my fat gut when carrying appendix, etc.). The good news is my shooting hand is silky smooth and exfoliated. Overall a great product!
The next step was to install an extended magazine release, but why stay with the same color as the gun, let’s go red (black and red, the Dagger Defense colors). I bought this magazine release from The Glock Store, a great online store for various Glock accessories, to include the matching red magazine baseplates.
Installing the magazine release was probably the most trickiest of the mods, I did find a great video that goes over the process very well. I recommend using a small flat head screwdriver, some videos say you can use the Glock tool, but I don’t recommend it. You need the flathead screwdriver to pull the tension bar outwards to disengage it. You’ll see what i’m talking about, just watch this video…
Installing the new, red magazine baseplate was easy, it just takes strong hands to push the sides of the magazine in while pulling out the old plates. You will also need your trusty Glock tool or a standard punch. Here is a video to show the process, overall easy process though…
Finally, I had to install proper sights now that I have a barrel that accepts a suppressor. Is it necessary, not really, i’ve shot suppressed without raised sights, it takes practice, however, it’s not recommend. I may even switch back to regular night sights as I will shoot mostly without the suppressor. It’s the price you pay for doing things just to to do them I guess.
I found a decent deal on Ameriglo tritium supressor sights on Amazon for about $80. As with any sights, you will need special tools to install, I found a Glock tool and sight tool combo for sale on Amazon which made it easy. For the rear sights, well, that’s a little more tricky and involved. I won’t go into detail about installing rear sights, although a rear sight removal tool is of course needed…to do it properly. Here is a video from The Daily Shooter explaining the process of changing out the rear sights. A rear sight tool runs about $100 for a decent one, I chose the RST Rear Sight Tool on Amazon and it worked just fine. The one used in the video is different and it goes down to preference. There are other videos showing how to remove your rear sights without a special tool…that’s a risk to save some money I didn’t want to take.
Ok, now that the mods are complete, I had to add some flare and what better flare than the reverse American flag. Many of us have worn this on our sleeve, it symbolizes “moving forward” and just looks great. And yes, the reverse American flag is an authorized form of display. For more information, please see Army Regulation 670-1 which explains the history and purpose of the reverse flag.
I enlisted the help of my friend who does laser etching and he put it on for me. Once it was done, it came out in kind of a bronze color, which gave it a classic look. To top off the complete geek, I fitted the Glock with the Dagger Defense DD-SD01 pistol flashlight, a must have for a bedside pistol.

With that all said and done, I believe I accomplished both tasks I set out to do. I love this gun, I love the feel of it in my hand, the grips and the trigger. I should have retitled the article, “The Making of a Glock Fanboy.” A friend put the fascination with Glocks in very simple terms, it’s like a dress up doll for grown men.
The second task was to build an aftermarket pistol that is more affordable than the expensive models you can buy. I will say that I did keep the price well below the $1,000 mark, this is far below the prices you will see custom jobs for at $2,000-$3,000. The major difference is that I did not have fancy slide work done and maybe some small tweaks. Even if I did, that would only add on about $400-$500, still below the cost of a custom job.

The last thing I need to do now is shoot this thing…more to follow…